Community Eye Candy: Bulking Up
December 9th, 2014
Cuddled up with some cozy woolens is the only way I leave the house on chilly days. Today’s projects made with bulky yarns look like the perfect thing for keeping the cold away.

First up some hats: Margotchien’s Galicia (with a very handsome friend!), ThePoorGirl’s The Vermonter from Maine, and GingerTwistStudio’s Mint Tea.

Next, some cowls: lisaviolinviola’s Tesserae Scarf, buenger60’s Cabernet Infinity Cowl, and xstitch’s Candy Crush Frieze.

And finally, some sweaters: knitthehellout’s Paloma, purpurschnecke’s justus, and callas’ Lund.
I hope that whenever you see cold weather, and however cold it is, you can snuggle up with something cushy and warm.
Thursday Tip: Blog Post Archive
November 21st, 2014
It’s been a little more than a year since we started doing Community Eye Candy posts on Tuesdays, and Thursday Tips on, you know, Thursdays and the response has been incredible! It’s the feature I hear complimented the most from Ravelers I meet in real life, and we’re all really proud of what a great resource these posts are.
The one complaint I’ve heard is that it’s hard to find the posts to get back to them and it’s true! So, today’s tip is about our new blog post archive – a single place to see all of these eye candy and tips posts so you can refer back to ones you’ve read, or find new ones you missed the first time around!
![]()
To get to the archive, click on the question mark in the top nagivation. This will take you to our help page, which is filled with resources to assist you with using Ravelry. Near the top of the page is a search bar – this searches our best help resources, including the blog posts. Keep scrolling down the page and you’ll find links to the 6 most recent posts, as well as a link that takes you to the whole archive. The posts all list the title, the day they were published, and an excerpt to make it easy to find your favorites!
Next week is a holiday in the US, so we’ll be celebrating with our families and will take a break from the blog. Maybe you’ll use that time to peek at the archive and find a post you missed! And we’ll be back in December with more beautiful crafts and informational tips.
Community Eye Candy: Halloween Rav-moji
November 4th, 2014
If you’ve used the Ravelry forums before, you’ve probably noticed the little icons that pop up after you type certain words, we like to call them Rav-moji. Today’s eye candy was suggsted by the Raveler dustyboyer – items that echo those icons! And to make it seasonal, I focused on our recent Halloween Rav-moji.


First up, we have some skulls and some candy corn. Clockwise from top left we have: RaeADay’s Fall hats and scarves, inagaddadonita’s Candy Corn Socks, Wollsause’s Skull Shawl, and SoulEcho’s Sugar Skull Bag #2.

Next up, we have the haunted houses. In the top row we have peacockmom’s Haunted House cloth and sweepsheep’s zu Hause im Glück ToLa. They both used the same pattern, but one with intarsia and one with doubleknitting. Both are spooky! And on the bottom there is bronnyaur’s Haunted House, which is an incredible collection of pieces!

And finally, Frankenstein’s monster. jandcmitch13’s Frankenstein Hat and Diaper Cover is adorable. As is Pobby’s Halloween Frankenstein Hat. And knitsublime’s Frankenstein is part of a sweet Halloween tableau.
I hope everyone who celebrated had a great Halloween, and that all Ravelers enjoy our seasonal Rav-moji!
Thursday Tip: Your Profile Page
October 23rd, 2014
Your profile page is the place to introduce yourself to Ravelry! You’re in charge of that space and there’s no wrong way to use it. Today we’re going to cover all the fields on the profile page to help you fill it out to your comfort.

The link to edit your profile is on the left side under your username. We’re going to go through the edit page section by section.
your ravatars
![]()
On the left side of the page are your Ravatars. You can click the button to upload a new profile picture (if you want help with that check out my blog post on that process). The Ravatars below can be deleted, or dragged into a new order.
important stuff

- Email Address: The first field is for your email address. If you click the change link you’ll be able to update it and select whether you have your Ravelry private messages forwarded to your emails. We only use this if you use contact us to send us a message, pattern links are emailed to the email address associated with your Paypal account. And so you know, we never sell or share your information.
- Blog URL: The blog URL is the place to enter the web address for your blog if you have one. Once that field is filled you’ll have the option to enter an RSS feed to link your blog entries to your Ravelry profile – we’ll show your posts in your profile and if you mention Ravelry projects we can link to a thumbnail of those, too (you can see an example on Sarah’s profile page).
- I measure yarn in: Choose what units you prefer – metric or imperial. We’re still working on supporting this option everywhere across the site, but in places where we show only one unit, we refer to this field to figure out what to show you.
- Privacy: These checkboxes allow you to configure how much you reveal about the time you spend on Ravelry. While there’s a checkbox to allow people to chat with you, we don’t have one-on-one chat right now. If you’re looking for a place for that, I’d recommend finding a group with their chatroom turned on!
password

- Update your password: Enter a new password here and you can change your password after clicking the submit button at the bottom of the change.
- Change your username: Click the link to change your username. You get 3 changes, so use them wisely!
- Apps with access to your account: If you have used any of the mobile apps that link to Ravelry, you can control whether they can access your data here.
personal bits

- First name: This shows up when people hover over your Ravatar across the site so tell us what you want us to call you!
- Birthday: If you fill this in your get a little cake icon on your Ravatar on your birthday.
- Where are you?: Filling in your location helps customize Ravelry for yourself. It lets you see local yarn shops near you that carry certain yarns and anywhere on the site that you can search nearby (users, yarn shops, etc) we use this information. It also shows up when people hover over your Ravatar. If you don’t feel comfortable naming your actual town, you could try your county, or another town in the area.
- Years knitting, crocheting: Just for fun, a place to let us know how long yarn has been in your life.
- Any pets? Kids?: Again, a fun way to share a bit of your life with other users.
- Favorite colors: If you engage in swaps, this is a great piece of information to fill out to help your swapee learn about you.
- Fave curse word: Some folks put a real curse word, some a funny phrase. I like punctuation since it lets you use your imagination.
social sites

This is where to let people know where else they can find you on the internet. We have a long list so check it out if you want to be linked elsewhere in the online world.
about me

The about me section is totally free-form. You can enter links, images, videos. If you think there’s a question we should be asking, answer it here! This is really your space to tell us what you want Ravelry to know about you :)
delete
We hope that you love Ravelry and never want to leave, but if you do, this link at the bottom of your profile page is the way to do so.
Now you know all about your profile. Everything in there is optional, but whatever you want to share we want to see!
Community Eye Candy: Make That For Me One More Time
October 8th, 2014
I’ve been thinking lately about our favorite patterns, the ones we go back to over and over again. So today’s eye candy features Ravelers who have made the same pattern more than once.

First up, seastar1 has made Cladonia twice – once in her handspun and once with stripes.

Next up, we see someone who has perfected her go-to baby knit! Here are just a sampling of the projects morganmagic has made from Milo. There’s one with a matching hat, a gorgeous tree pattern, a feminine lacing detail, and green and yellow stripes.

I love that ChaoticK really played with different colors with her Fox Paws. The tall scarf, the cowl, the scarf in progress – they’re all really fun combos.

And finally, bellanordica could wear a different Flare every weekday. Monday, Tuesday, Wednesday, Thursday, Friday – she’d be impressing everyone she passed with her gorgeous work.
When I went searching for projects for this post I was blown away to find that of the projects completed in October, over 2,000 of them were repeat patterns! It’s so fun to see the different ways we tackle the same project over time.
Thursday Tip: I Bought A Pattern – How Do I Get To It Again?
September 25th, 2014
It’s a lot of work to find the perfect pattern for your project and when you do you’ll never want to lose it. That’s why when you purchase a pattern on Ravelry, you have access to it forever. So, just how do you get back to that pattern you bought last month or last year? Read on to find out 5 different ways.
Your Email Receipt

When you purchase a pattern on Ravelry, after your Paypal payment clears you’ll be emailed a receipt with a link to download the pattern. These emails come from downloads@ravelry.com and the title is the name of the designer and your PDF downloads if you need a hint on how to search for them in your inbox.
Your Library

Your library can be found in your notebook and is a repository of all the patterns you’ve purchased on Ravelry, as well as books, magazines, etc that you have marked that you own. All the patterns you purchase are stored there.
Get to your library by clicking on your username in the top right corner of the screen and then clicking the library icon. Once in your library you can search and sort your library to find the pattern – click on it and start your download.
Your Purchases

There’s another notebook section that houses the Ravelry purchases you make – your purchases. One caveat is that only purchases you make while logged into Ravelry will show up in your purchases. If you happen to buy a pattern while not logged in you still have your email receipt and can add it to your notebook, but it won’t show under your purchases.
The purchases section can be found in the side navigation of the notebook. Scroll down to the pattern you want to download and click on the name to be taken to a receipt where you can access the PDF.
The Pattern Page
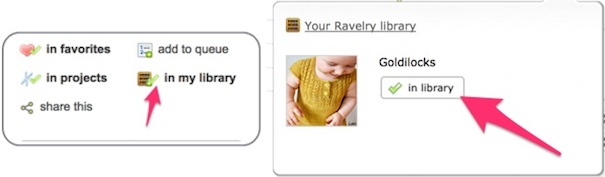
If you find yourself back on the pattern page of a pattern you’ve purchased, that’s a great way to access the PDF as well. Click the in my library icon on the right and then click in library on the resulting pop-up and you’re in business.
Your Project Page
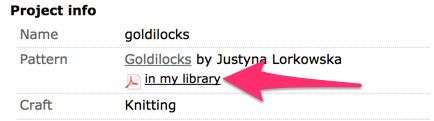
If you’ve made a project with your pattern and made a project page in Ravelry, that’s another easy way to get back to your PDF. Just under the pattern name is a link in my library and clicking it brings up a pop-up where you can download the pattern.
So there you have it, 5 easy ways to get back to your PDF pattern after your initial purchase. Have fun checking out your previous buys and approaching them anew or again.
Community Eye Candy: Garter Stitch!
September 16th, 2014
I’m sure I’m not the only one gearing up for some fall knitting and in my neck of that woods that means squishy, delicious garter stitch. Today I want to show you some of the amazing garter projects that have been completed recently.
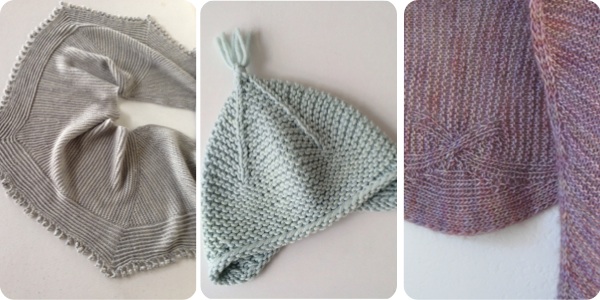
First, check out what you can do with garter stitch and a beautiful semisolid yarn. Nordicneedles’ Lake Superior Inner Peace, Windansea’s Pale Blue Garter Ear Flap Hat, and mpgsmom’s My Marin.

Oh, turns out garter looks just as amazing in colorful projects. knittintin’s Spimppeli!, aKnitOnTheSide’s ZigZags for me, and Deloi’s pendulum.

So, it also appears to be gorgeous with other stitch patterns, too. juliebie’s Rivulet, hadams’ His and Her Garter Ridge Baby Earflap Hat, and BetsyJo’s Pinecone & Mulberry (and her model is wearing an awesome garter-y sweater, too!).
Happy fall knitting to all of you! I hope you’re enjoying a change in the seasons and your knitting, too :)
Thusday Tip: Advanced Forum Post Formatting
September 4th, 2014
Last month I wrote an introduction to forum post formatting, which I (humbly) recommend if you missed it and like posting on the forums. Today I’m following up with some extra tips that I couldn’t fit in last time.
Polls

Polls allow you to get the opinions of your fellow forum members on anything you desire. They’re easy to set up, too! You start with the word poll and the title, and then type out the poll options as a numbered list.

Spoilers
Do you know about our radar? You can watch the latest posts from all over Ravelry appear on one page. It’s a great way to find new groups that seem up your alley! But what if you want to be able to follow radar without worrying about finding out the latest from your favorite book or TV show?
Posts will be hidden from the radar as having spoilers if they are in a thread with spoiler in the title or SPOILER is in capital letters in the post.
Footnotes
I think a picture illustrates this best. Enter a [^thing] where you want the footnote in the post, and a matching one at bottom with the actual footnote.

Definitions
Similarly to footnotes above, definitions are made with a matching bracketed word in the post and below.

Fun Formatting
- horizontal line: *** or ___ on a line by itself –> a dotted horizontal line
- strikethrough:
<del>word</del>–>word - small script:
<small>itty-bitty</small>–> itty-bitty - large script:
<big>large</big>–> large - superscript: word
<sup>(up high)</sup>–> word(up high) - subscript: word
<sub>(down low)</sub>–> word(down low)
Full disclosure, I got these tips from the excellent wiki article on using the text editor. If you found this interesting there are a few more tidbits in there worth checking out! Just like last time, I have a thread ready for you in the Help group if you want to try out the tips you just learned. Enjoy experimenting!
Community Eye Candy: Yellow!
August 19th, 2014
Some days I know exactly what my eye candy will be, and others I find myself paging through project search for inspiration. Today my eyes kept being drawn to yellow projects, so that’s what I have for you.

For the littles we have: noturgma‘s Lillie Baby Cardigan Matching Hat, sarindr‘s shell dress, and Dutchrosa‘s Emu pram suit pants & cardigan

And for grown-ups we have: snuzy‘s Indian Summer, SiO2‘s SpliTTop – Mustard, perlatora‘s Banana in the Fig Tree, and Golubka‘s Gingko.
Once I knew I wanted to focus on yellow finished objects, it was easy to find projects for today’s eye candy by using the Color Family filter in the advanced search and selecting all the shades of yellow. The projects above feature a single shade of yellow, but for some gorgeous colorwork here’s a bonus link to projects that feature multiple shades of yellow.
Thursday Tip: Forum Post Formatting
August 7th, 2014
![]()
Have you ever seen this bar at the top of the text box when you’re writing a forum post and wondered what do all of those buttons mean? Today we’re going to walk through all of them so you can feel confident formatting your posts. Formatting bars like this show up in lots of places across the site where you can enter text (forum posts, project notes, etc) and are shortcuts to add formatting to your text. We use markdown syntax to format text, so if you’ve used that the info here may be familiar. Let’s start with the buttons on the left and move across.
Text Buttons
![]()
If you highlight text and click the B and you’ll see ** show up around your text, which comes out as bold when the topic is published. If you don’t highlight anything, the ** ** will just show up at the end and you can enter the text you want to emphasize in between.
Click the I and you’ll see * around your text which is translated into italics when published. Just like with bold, highlighting before you click will put the * * where you want it. Oh, and if you want to use an * in your text without it meaning italics, just put spaces around it and no special formatting will be applied.
Links and Media
![]()
The earth with an arrow is the symbol for a link. Use that button to insert a link in your post. Bonus tip: If you hover over it you’ll see a tooltip with a keyboard shortcut for entering a link, Ctrl + L. All the buttons have one, so look for them if you have a favorite button.
The quotation marks are for quoting text. You’ll see a > appear next to your text and when it’s published it will appear quoted. This can be a handy way to make it clear what part of a previous post you’re replying to.
The polaroid picture is for inserting pictures into your post. Follow the instructions after clicking it and you’ll be able to enter a picture from an item in your notebook, from elsewhere on the internet like Flickr or Instagram, or upload it directly from your device. You can even drag and drop images to the text box after clicking the button! (Uploading directly from your computer to the forums requires the purchase of a Ravelry Extra for $5/year. You can read more about that here.)
The last icon in that group, the grey globe, is a webcam. If your device has a webcam and supports Adobe Flash (aka is not an iPhone/iPad/iWhatever), then you can take a photo with a webcam to insert into your post. If I’m doing this in For the Love of Ravelry, I’m feeling very silly that day :)
![]()
Want to put a video in your post? Click the little TV and enter a link to a YouTube,Vimeo, or Vine video.
You can insert an audio file like a song in your post by clicking the music note button and entering a link to a .mp3 file.
Lists
![]()
The first list button helps make a numbered list and the second list button makes a bulleted list. You can see the difference while you’re typing because the number lists have 1., etc next to the items and the bulleted lists have a * next to the items.

Ever wanted to organize your text with headings? That last icon in the list section has a few different ways to create headings in your posts. Keep clicking it and you’ll see a few different kinds of headings pop-up: ##, ==, and — all create headings with different sized text so play with them and see what you like!
Time Machines
![]()
Okay, technically they’re just undo (the left-pointing arrow) and redo (the right-pointing arrow) buttons. But I like to think of them as tiny time machine buttons that help me go backwards and forwards in time to get to my favorite version of a post. I assume I’m not the only one that often types and retypes until I get it right. :)
Preview
![]()
The preview button pops up a little window that previews how all the formatting in your post will look. It’s a great way to see how all those * and = and # are translated into pretty formatting.
And the question mark? That’s how you get help if you ever have questions about text formatting in the forums. You’ll be opening the wiki page with info on our text editor. We can’t fit shortcut buttons for everything that the text editor can do in that little grey bar, so read that wiki page if you want to do something I haven’t covered in this post. I learned more about how our text editor works by writing this post, and if you want to get straight to work trying out all the stuff you learned, feel free to use this thread in the Help group!


