Eye Candy: Brioche
January 31st, 2017
Recently I was looking for a way to stretch some precious handspun to make legwarmers for my daughter. After looking through Ravelry projects using 2 colors of yarn I found myself most inspired by brioche, a stitch pattern that creates a distinctive ribbed appearance. Today’s eye candy highlights some recently completed brioche projects so I can share my inspiration with you.
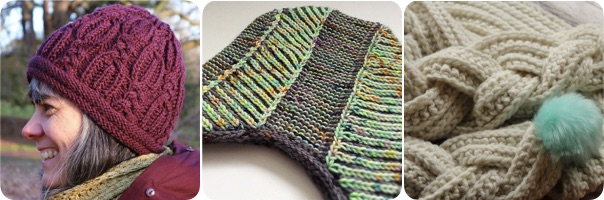
One thing I love about brioche is the texture, and how well it mixes with other stitch patterns. These projects really highlight that! From left: fingertips’ Dusky 1 , millefleurs’ Brio-Garter Hat, and takychik’s Crochet à la Brioche Scarf (yes, this is crochet that looks like brioche but eye candy is about beauty, not technicalities).

I also enjoy how brioche can be a fun way to play with color. These combinations all make me swoon. From left: megswd’s Ramble shawl, NapaGal’s Buttery (Crocheted) Brioche (yes, more bri-croche), and behutsam’s Pink Frost (I think this is my platonic ideal color pairing).

And of course, I always love seeing how crafters apply a technique to an entire garment. From left: kuduja’s Rips + patent nr 4, evasnitkin’s Chunky Brioche Cardi, and megy’s Counterpane.
Tip: Mobile Project Search
January 19th, 2017
Last year we introduced you to our mobile pattern search, and today I want to walk you through the mobile project search – a mobile-device friendly interface for the projects section of our advanced search.

The hardest part about the mobile project search is getting there! When you’re on any other mobile page on Ravelry (forums, pattern search, messages, library) you can click on the name of the page at the top to open the mobile navigation. From there click on the search link to get a handy pop-up with links to all the section of advanced search, including project search.
Just like in the desktop version, the advanced search for projects allows you to enter search terms, sort your results, and select from several views of the output.

You can also filter the results to narrow down to exactly what you’re looking for.
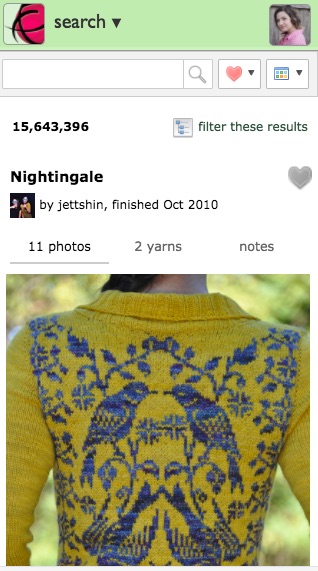
Each project result comes with 3 tabs. The main tab you can see above features a big photo so you can get up close on the details of the project.

The yarn tab shows the yarns used, with the total for the project up big at the top. I make use of this tab when I am studying projects to determine how much yarn I need – I can scroll easily through the yardage used for multiple projects without leaving the advanced search screen.

And finally there’s a notes screen with the project notes. Again, I love that I can see the notes for multiple projects from the advanced search page without navigating away to individual projects.
Let us know what you think of the search in this thread. We hope you find it as helpful as we do!
Community Eye Candy: New Year, New Projects
January 3rd, 2017
Hello! After some time off with our families, we are excited to be back to our regular blogging schedule. Today’s eye candy features projects completed in 2017. I love that these Ravelers have already made time for crafting in this brand new year!

Ne11’s My Inner Beast – IFFF 2016 Magic Ball Swap, domhopton’s Milk and Wine Crinum Lily, and spaetzel’s MacLean of Duart Tartan Throw.

winger707’s Not Quite Pome, indigopurl’s Fairisle cowl, and SussexYorkie’s Vintage Mercury.

spokpandabarnet’s Cotton roses, Moonstruckmermaid’s Whatwhatwhat, and winterludes’ wintermood.
I hope your year is off to a fantastic start. We are looking forward to sharing it with you!
Tip: Pattern Page Recon
December 16th, 2016
The Ravelry pattern database currently has over 650,000 patterns, and while I love having so many to choose from, sometimes it can be hard to pick from that bounty. When there aren’t many project attached to a pattern to help me envision how it might turn out, I look for clues on the pattern page itself. Today’s tip is some of the ways I assess a pattern page to evaluate if a pattern is what I’m looking for.
Photos
Photos are the first thing to draw me to a pattern page and they are also what can keep me there. The ones I most love to see are:
- the whole project
- close up of the details
- a modeled picture
- the project laid flat
The modeled and flay lay pictures are especially helpful to me for garments. It helps me to get an idea of the shaping and imagine how it might fit me.
Pattern Details

The details section of the pattern page is the next place I check. I love to work from my stash when I can, and I have technique preferences. When the details section is filled out I can check for all of these things. The gauge, suggested yarn and yardage range allow me to check my stash for suitable substitutions. The attributes can give a lot of insight into the construction of the item – I can see that this is knit top-down in the round, it has a raglan sleeve and waist shaping, and is seamless. There’s a schematic and a written pattern, too.
Description
If I’m still interested after perusing the pictures and details, I move onto the pattern description. My favorite things to see are:
- a bit of romance copy describing the pattern construction and inspiration
- for garments, the intended ease
- for garments, the size the model is wearing and their measurements
- for items with multiple sizes, the yardage for each size
Comments

Finally, I love to check out the comments on the pattern. I can filter to see responses from the designer, or from people who have already made the pattern. It’s a great fill-in for reading project notes.
And that brings us to the end of how I study a pattern page. I hope this info gives you ways to find the perfect pattern for your project!
Community Eye Candy: Tablet Weaving
November 29th, 2016
Weaving is one of the crafts on my someday list, and the kind that makes me most likely to start daydreaming is tablet weaving. I love the ingenuity of using cards as your loom, and it’s so easy to think of all the button bands and trims I could make. Today’s eye candy highlights some tablet weaving projects that caught my eye.

Our first trio shows how tablet weaving can be a canvas to create pictures or words. From left: MrsCollinHobbs’ Poppies, mozartnuts’s Evergreens, and breimiepjemarnel’s key cords.

The next set is tablet weavings in cool uses. From left: reanbean’s Shoelaces, woolandneedles’ Tablet Weaving – Guitar Strap with Fish Pattern, and Hemma’s Otto (a horse leash!).

And finally, some projects that are just gorgeous. From left: llunallama’s Tablet Weaving, SingingSanja’s GothicGirlyGarger, and Peregrina1’s Köper-Seidenband.
I hope you enjoyed these projects! If you find them as inspiring as I do, check out the Tablet Weaving group on Ravelry.
Thursday Tip: Adding Your Blog
November 17th, 2016
Ravelry was started because Jess wanted a place to keep track of all the projects she was seeing on knitting blogs. It’s nearly 10 years later and while we love our database of patterns, projects, and yarns, we still love seeing what is happening in crafty blogs. Today’s tip will teach you how to add your blog to your profile, link it to items in your notebook, and where else those posts will show up around the site.
Adding Your Blog
You can add your blog to Ravelry from your profile page. Go to edit it and among the top fields on the page are the place to enter your blog’s URL and RSS feed.

You’ll notice that I have different addresses there – the blog URL is what I would type in my browser if I wanted to visit the blog, while the RSS feed is what a feedreader would use to keep track of new posts. Your RSS feed URL will depend on where your blog is hosted. If you can’t find it, check to see if it’s automatically in your template, or ask the website where you run the blog for help in finding it.
After you hit save we’ll bring you back to your profile where there will now be links to your blog in a couple places. Above your projects we’ll show a screenshot of your site that links to it. And below the about me section we’ll have a list of your blog posts. New posts won’t show up instantaneously, but we update the list regularly.
Linking To Notebook Items
Once your blog is listed you can start linking it to the items in your notebook. If you have a new blog with just an entry or two, you may want to choose the route of going straight to those notebook items and linking them from the blog posts tab there. Casey has a great post on this. If you added an existing blog and want to quickly link many items, I recommend using your blog posts page. You can get to it from the blog posts section of your notebook menu, or the link below your blog posts on your profile page.
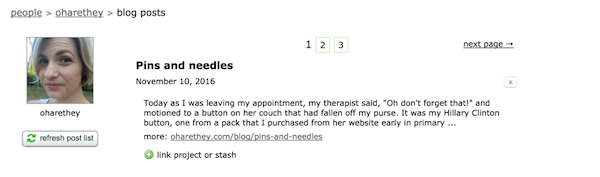
Below each entry there’s a button to link it to items in your notebook. Additionally there’s an [x] to the right of each post that allows you to remove duplicates or posts you don’t want on Ravelry. If you want to get a post up on Ravelry right away click the refresh post list button and we’ll check for new entries.
Your Posts Across the Site

Blog posts show up in a couple places around the site. Patterns and yarns have blog post tabs that list blog posts linked to projects and stashes in user’s notebooks.

If you share a project or stash with a group, linked blog posts can show up on that group’s homepage. There’s room for the 4 most recent posts, so how long yours will stay up depends on level of group activity.

You can catch up on the latest from your friends on the friends’ blogs tab of the friends section of your notebook. You can filter that feed to show only your friends in specific Ravelry groups, or in the friend sets you’ve created.
And that wraps up my summary of blogs on Ravelry. I look forward to seeing what you’re blogging about!
Community Eye Candy: Crafted Costumes
November 1st, 2016
If you are a regular reader of the Ravelry blog, you know I love doing Halloween-themed eye candy posts (here’s 2013 and 2014). It is not that I personally go big for Halloween – I haven’t dressed for the holiday in 10 years – it’s that I find the costume FOs to be displayed with so much pride and enthusiasm. These were needles and hooks and shuttles moving quickly to bring joy to their owners and those sharing the holiday with them. And so, here is my third post highlighting recently completed crafted costumes. I hope you enjoy it as much as I do!
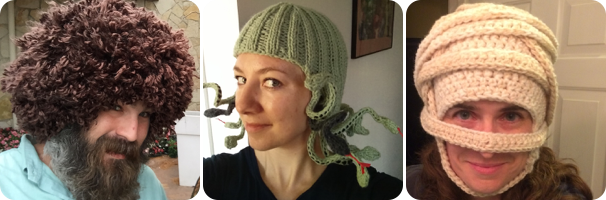
This first set of FOs shows how much of a costume can be contained in a headpiece. From left: goldapp’s Bob Ross Wig, sonironi’s Medusa Hat, and nutmegknitter’s Mummy Halloween Hat.

The second set shows that not just humans look great in a costume. From left: xeniajoy’s Devil Horns, humbleluna’s lion snood dog costume, and llim’s Crab Costume for Beckworth.

And this final set highlights some projects that took creepy and turned it into classy. From left: CedarLinn’s Spooky Spider Cowl, Vanja80’s Dance of the Vampires, and woolfrog’s happy pumpkin.
Tip: Quick Photo Adder
September 22nd, 2016
I love sharing photos of my projects on Ravelry, but sometimes it feels arduous to get camera photos onto my computer. During those times when I just want to share a quick snapshot I use the quick photo adder and for today’s tip I’m going to walk you through the process.

You’ll find a link to the quick photo adder in your notebook dropdown menu. You can also visit it at http://www.ravelry.com/photos/quick/upload. The interface is simple – select a photo from your device and select whether you want to add it to a new or existing project or stash entry.

If you visit the quick photo added from a mobile device, we also try to help you make a link right on your home screen. This is a great option so you can jump right back to it anytime without having to remember how to navigate to it.
Here’s a step-by-step tutorial of what the process looks like on my iPhone. It will be slightly different for other devices.

Click the share button to open the menu of sharing options.

Select the plus sign icon, which means add to home screen.

You can see what the icon looks like and select a title for it for your screen. Once you finish here you’re all set and the shortcut exists on your home screen.

I like to keep all of my photography-related functions in a folder, so I put my shortcut in there. Whenever I have a cute photo I can get right to the uploader and share it all with you.
I hope you enjoyed this overview of the quick photo uploader and how to get it on your homescreen.
Community Eye Candy: Kids
September 6th, 2016
One of my favorite people to knit for is my daughter. Kid-sized garments are so much faster than adult ones, and she is very appreciative of each FO – wanting to help me wash them so she can wear them again. For today’s eye candy I wanted to highlight some recently finished projects for kids. As always, we got permission to use all of the photos below where a child’s face is visible.

This trio of projects I found adorable. aidasofie’s Paint splash sweater, jobungalow’s rapunzel, and SevenOfNine’s Child’s Rainbow Socks exhibit the kind of whimsy and dreaminess that is so fun to see in a project for a little one.

Next up, some projects for little kids. Pitikje’s Spokane, Binkyboo’s Machine Knit Onesie, and Vikusik’s Tiarele are all exquisite garments for their tiny owners.

Finally, some projects for big kids. bloshka’s Beleaf Me, Violinka’s Flawless, and averbaver’s Azel Pullover could all fit into a grown-up wardrobe but look great on a bigger kid, too.
I hope you enjoyed these projects. I found them all via the project search – using terms like kid, child, preschooler, etc.
Tip: Four Forum Features
August 25th, 2016
Today’s tip is going to be a round up of some features you can find in our forums.
1. Unread Reply Notifications
Our forums are filled with lots of active threads, and to help you keep up with your conversations we include a notice at the top of your forums screen when you have received replies to your posts that you have not yet seen.
![]()
This is what the notification looks like. You can then click on the link with your unread reply count to get more information about those replies.

The title of the thread is a link to it, so you can go straight to the replies from there!
2. Hide/Disagree Ravatars
Ravatar is what we call your avatar on Ravelry – the little picture that appears next to your forum posts (among other places on the site). You may find that there are some Ravatars you would prefer not to look at, so you can use the hide or disagree features to do so. You’ll find the feature by entering a thread and clicking the little arrow under the ravatar.
![]()
If you select hide avatar we’ll replace it with a picture of yarn.
If you select disagree avatar we’ll replace it with the word disagree. This is great for posters who can make your blood pressure rise – a reminder for yourself to skip over their posts.

3. Customizing Your Voting Buttons
Below the posts on Ravelry are voting buttons – educational, interesting, funny, agree, disagree, and love. We like them, but if you do not want to see them you can change that on the forum settings page. You can uncheck any buttons you prefer not to see and you’re all set – no need to hit save or anything.

4. Customizing Your Main Boards
There are six main boards that every Raveler is automatically subscribed to when they join, you may see them referred to around the site as the Big Six – Ends, For the Love of Ravelry, Needlework on the Net, Patterns, Techniques, Tools, and Yarn. If you would prefer not to see these boards on your forum pages you can remove them on the forum settings page. As with the buttons, you can uncheck any boards you do not wish to see and you’re all set.

I hope these tips help you navigate the forums better and customize them in a way that makes them work for you! Thanks to soyloquesoy for suggesting this topic, if you have tip ideas we welcome them in For the Love of Ravelry.


